Bromeliads are the houseplants that look like they belong in a botanical garden but grow happily on a kitchen counter. Their vivid bracts — often mistaken for flowers — can hold color for months at a time.
The catch that surprises most owners: each bromeliad rosette blooms exactly once. After the bracts fade, the mother plant slowly declines while producing offsets called pups that restart the cycle from the beginning.
Understanding bromeliad care means understanding that cycle and the one feature that sets these plants apart from every other houseplant you own — the central cup.
What makes bromeliads different from every other houseplant
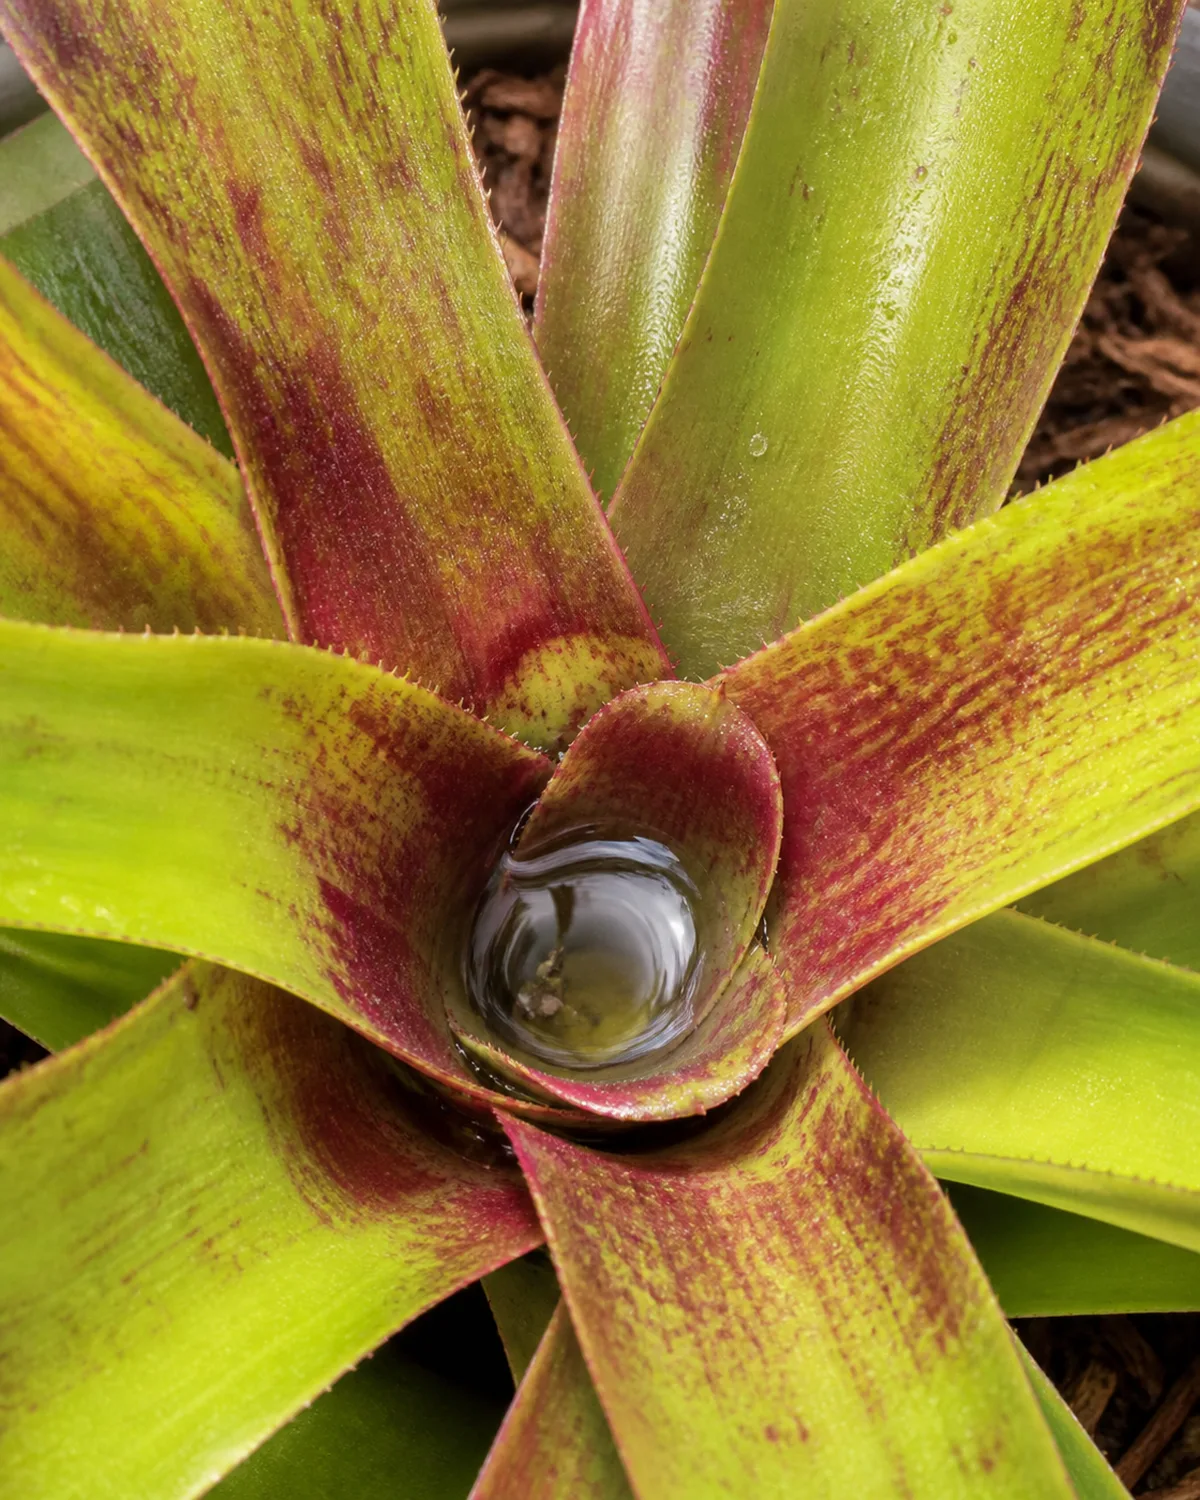
Bromeliaceae is a family of roughly 3,500 species, and the most famous member is the pineapple. The houseplants sold under the bromeliad label share the pineapple's defining feature — stiff, leathery leaves arranged in a tight spiral rosette that creates a natural cup at the center.
That cup is not decorative. It is a functional water reservoir. In the wild, bromeliads grow on tree branches in the tropical Americas, collecting rainwater and debris in their central tanks. They are epiphytes — plants that perch on other plants for access to light without parasitizing their host. The roots exist primarily for anchorage, not for water uptake.
Tiny scales called trichomes cover the leaf surfaces and absorb moisture and dissolved nutrients directly from the air and from the cup. This is why foliar feeding works on bromeliads and why the cup matters more than the soil.
Most indoor bromeliads belong to four genera: Guzmania, Vriesea, Aechmea, and Neoregelia. Each has a distinct visual character — star-shaped rosettes with vivid bracts, sword-shaped inflorescences, silver-banded leaves, or color-flushing centers.
The biggest surprise for new owners is the lifecycle. Bromeliads are monocarpic: each rosette produces one bloom in its entire life, then slowly dies over six to twelve months while growing offsets called pups at its base. Those pups mature, bloom, produce their own pups, and the cycle continues indefinitely.
What most people call the flower is actually a cluster of colorful bracts — modified leaves that surround the true flowers, which are tiny and nestled deep inside. The bracts hold their color for three to six months, far longer than any conventional houseplant bloom.
Four genera that cover the most common indoor situations — pick the one that fits where your bromeliad will live.
Light that brings out the color without burning the leaves
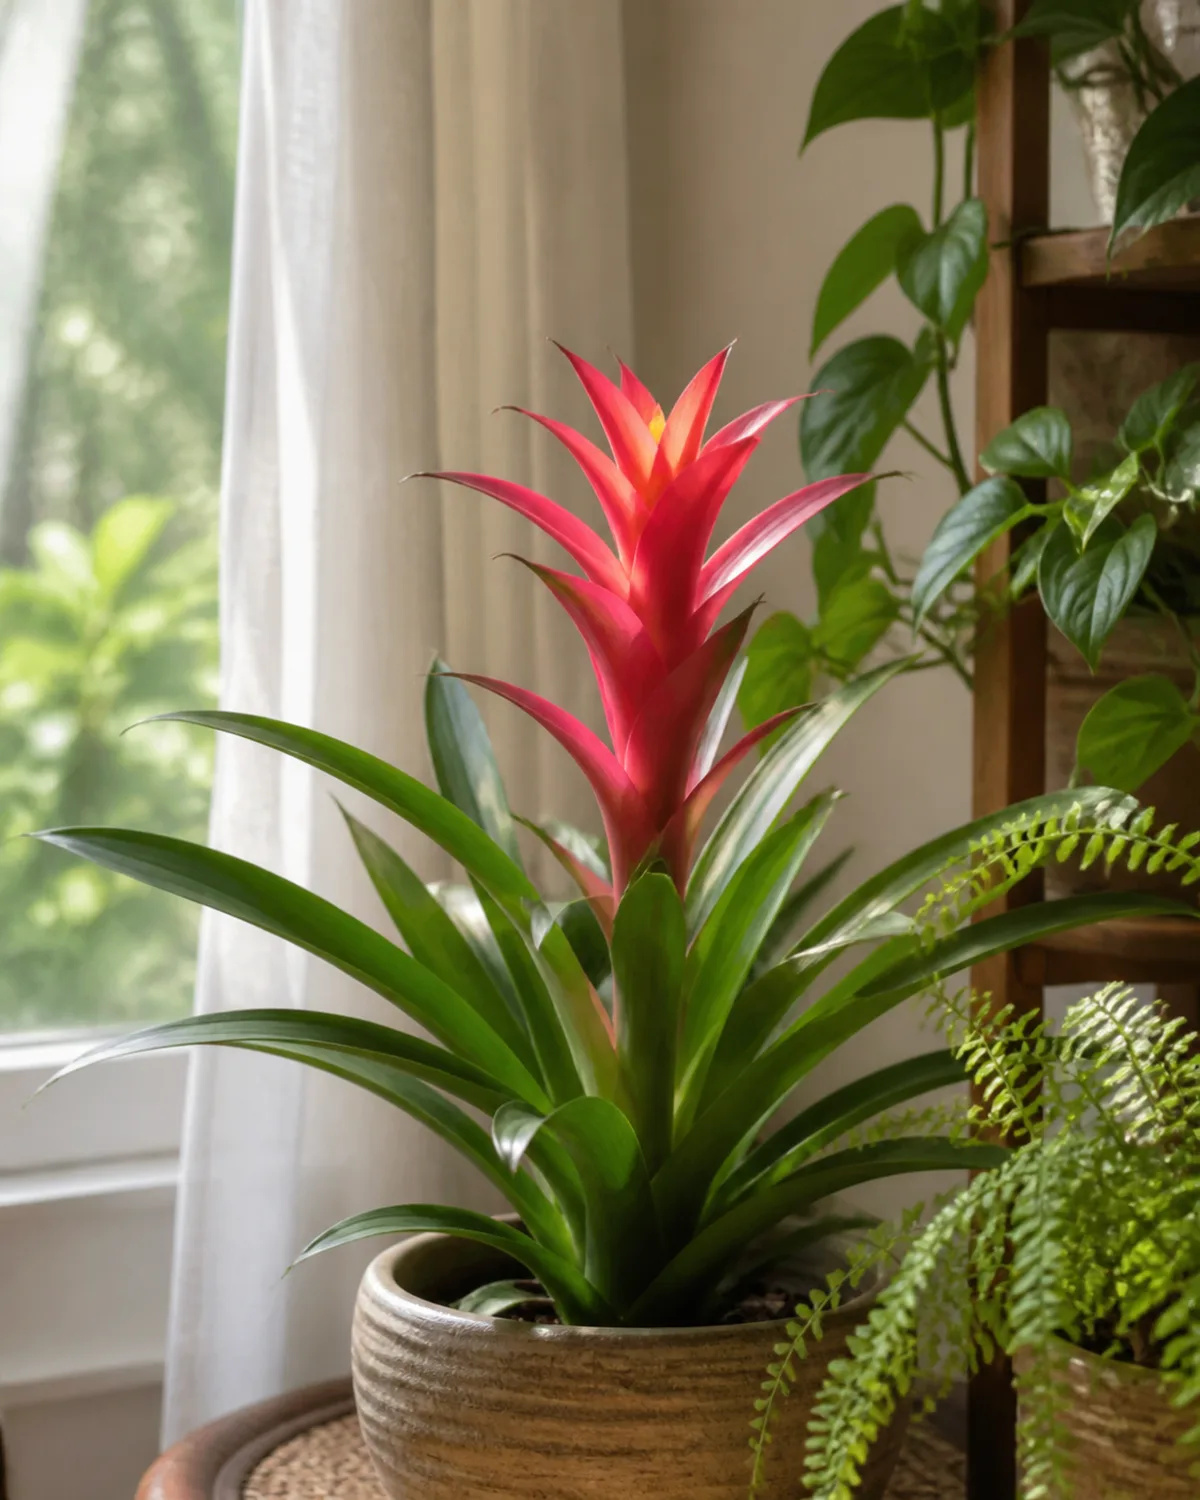
Bright indirect light is the sweet spot for most indoor bromeliads. An east-facing window delivers ideal conditions — direct morning sun followed by softer light for the rest of the day. A position a few feet back from a south or west window also works well, especially with a sheer curtain to diffuse the strongest afternoon rays.
In nature, bromeliads perch on tree branches beneath a forest canopy. They evolved to thrive in dappled light — not full sun and not deep shade. This history explains their indoor behavior perfectly.
Direct afternoon sun scorches bromeliad leaves. The damage shows as brown crispy patches and bleached spots on the upper surfaces.
Green-leaved species, particularly Guzmania and most Vriesea cultivars, handle lower light far better than variegated or red-leaved types. Neoregelia, which develops its famous center color flush in response to light intensity, needs the brightest position you can offer without direct sun contact.
Leaf color is immediate feedback. Vibrant, saturated tones mean the light level is right. Pale or washed-out leaves suggest too much direct exposure. Dark green foliage with no color development at all points to insufficient light — the plant is healthy but will not produce its showiest display.
Rotate the pot a quarter turn every few weeks to keep the rosette developing symmetrically. For supplemental lighting in windowless rooms or during short winter days, see the grow light guide. For matching any houseplant to your specific window direction, the light requirements guide covers every scenario.
The central cup method: watering a bromeliad the right way
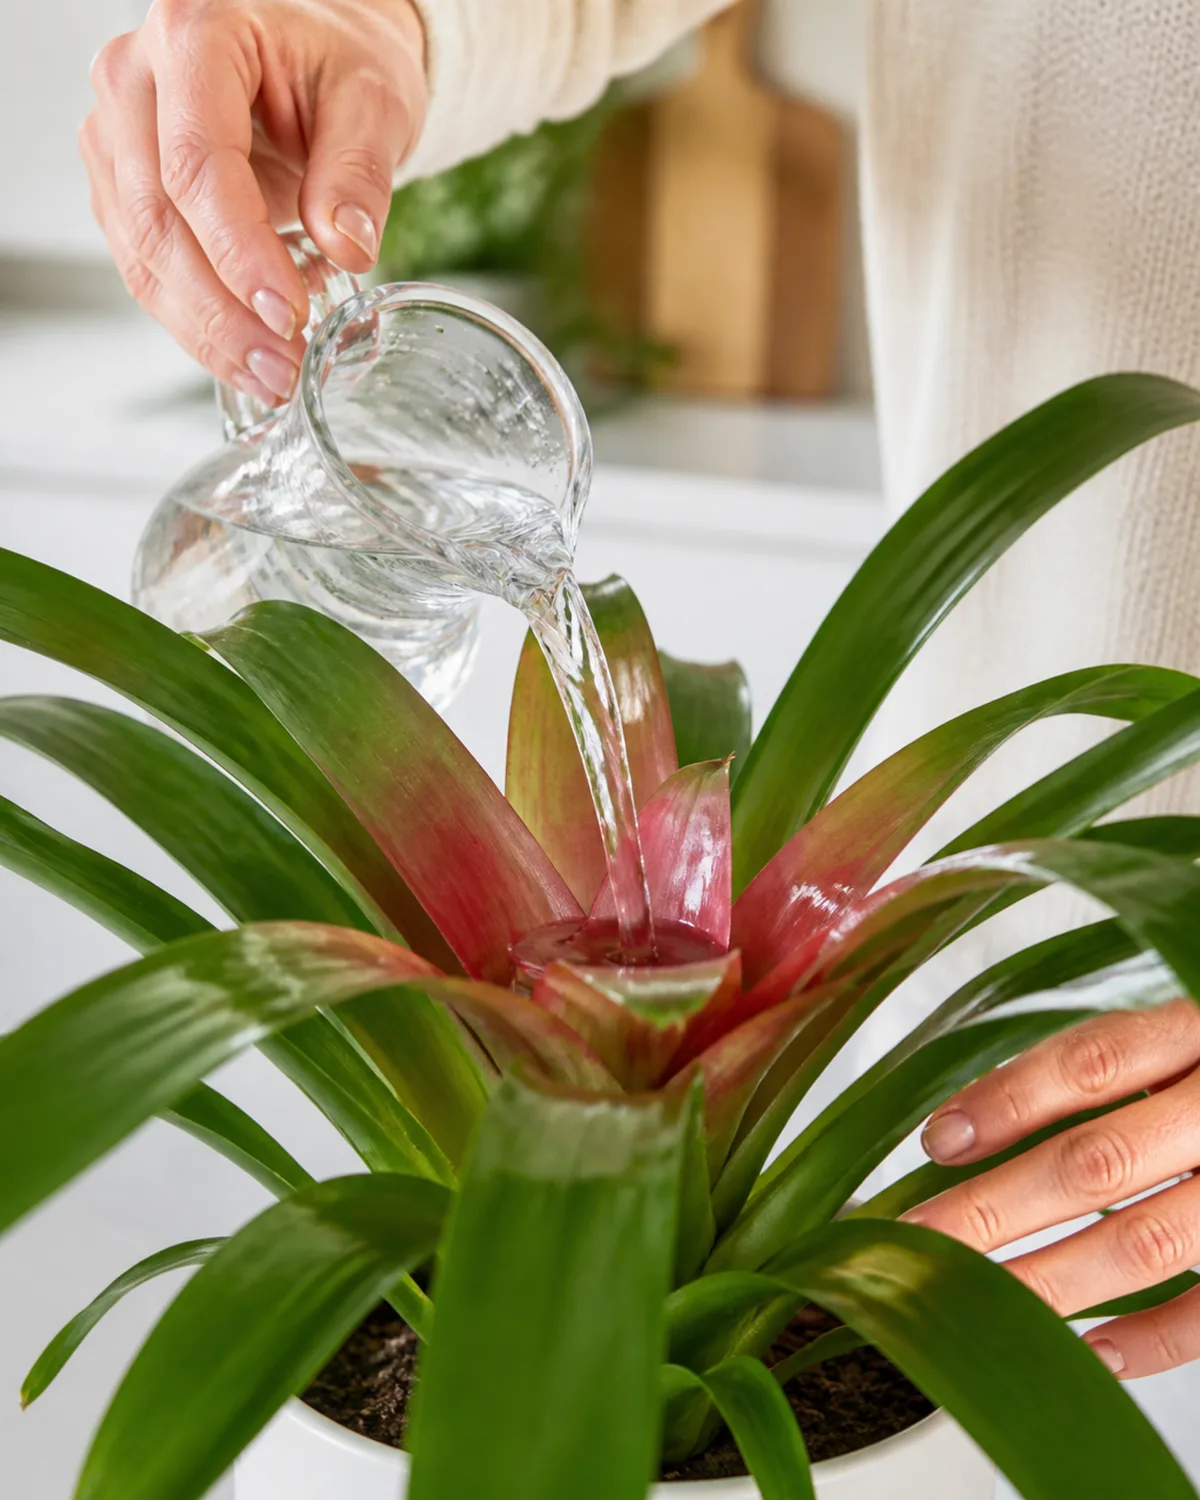
This is the single most important difference between bromeliad care and the care of any other houseplant on this site. Bromeliads collect water in the cup formed where their leaves overlap at the center of the rosette. That cup is the primary water source — not the soil.
Keep the cup consistently filled with water. Every one to two weeks, flush the cup completely: tip the plant to drain the old water, then refill with fresh. Stagnant cup water breeds bacteria and algae, producing an unpleasant smell and eventually rotting the central growing point.
Water the soil lightly and only when the top inch is dry. The roots of tank bromeliads serve mainly as anchors — water absorption happens through the leaves and cup, a trait bromeliads share with orchids though the mechanism differs. Orchid roots absorb moisture through a specialized velamen layer, while bromeliad leaves use trichomes.
Water quality matters. Use distilled water, collected rainwater, or at minimum dechlorinated tap water. Bromeliads are sensitive to chlorine and dissolved minerals. Hard water causes brown leaf tips and leaves white mineral deposits on the foliage that are nearly impossible to remove.
Never let the cup go completely dry for extended periods — consistent moisture in the tank is the plant's expectation. But empty the cup entirely if indoor temperatures drop below 50°F. Standing cold water in the center of the rosette causes crown rot, which is usually fatal.
For more on reading your plants' watering signals across different species, the watering guide covers the general principles.
Humidity and temperature for tropical comfort
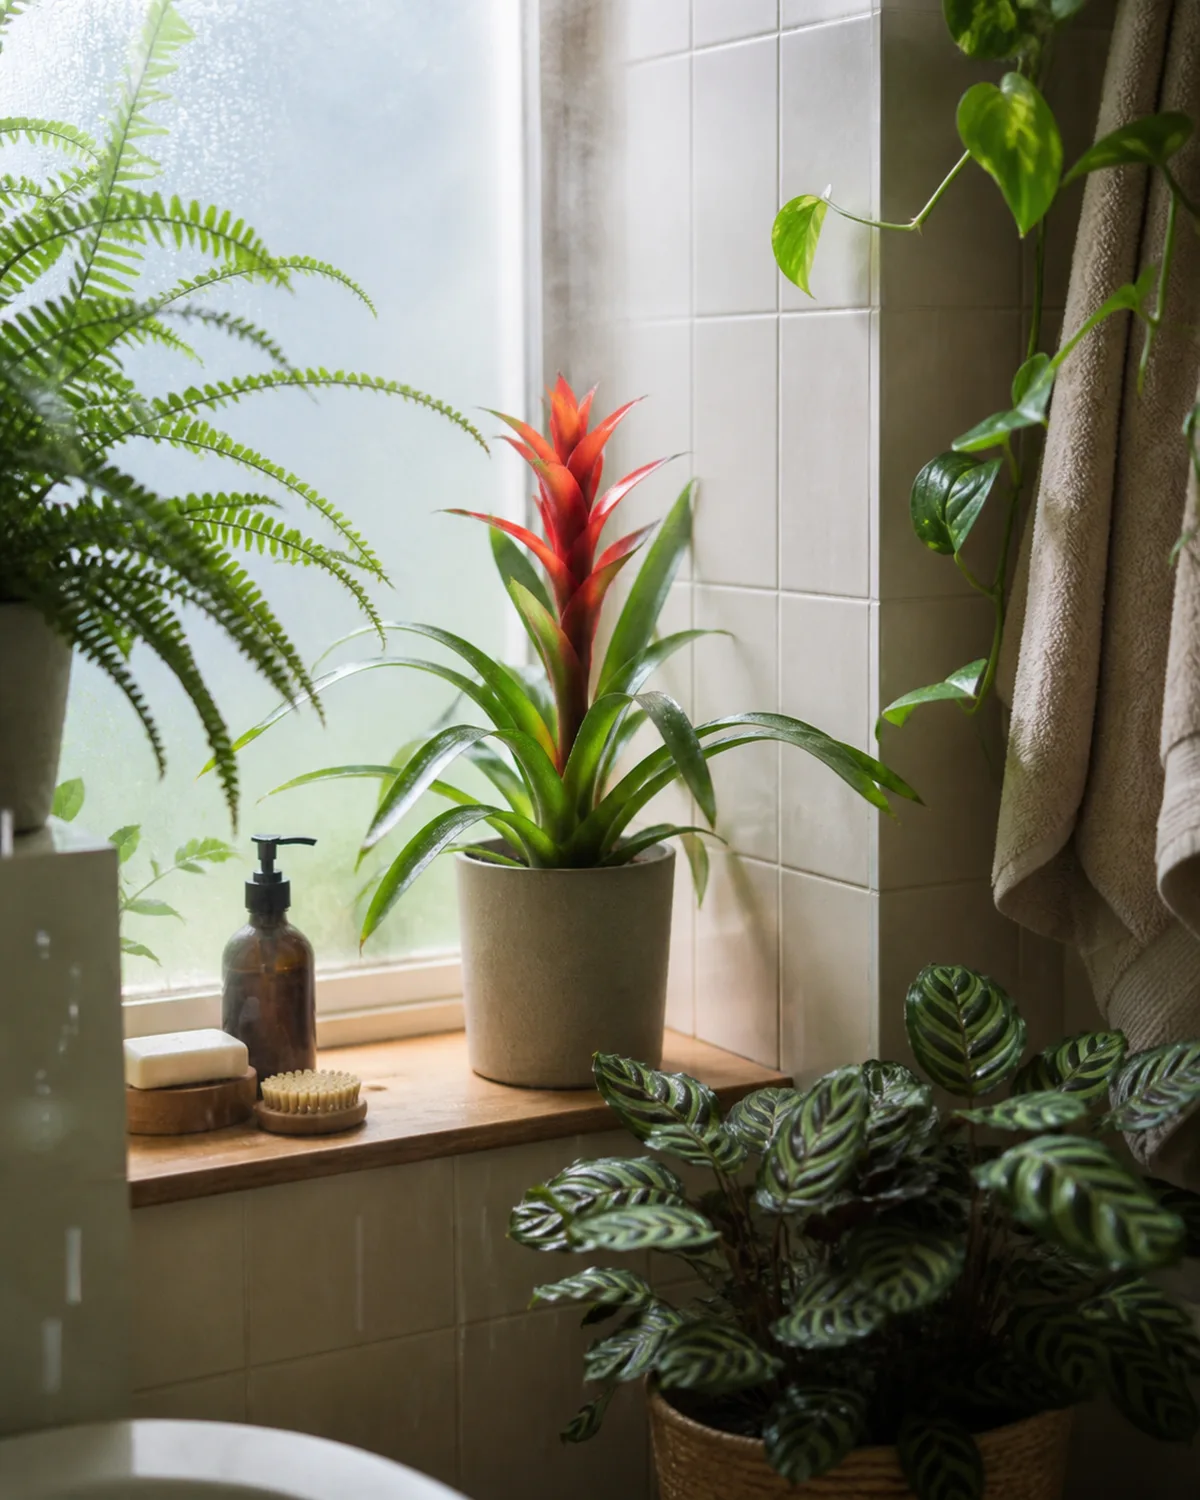
Bromeliads are true tropicals, and their comfort zone reflects it. Aim for 50 to 60 percent relative humidity — higher than the average home in winter but not the extreme levels that ferns demand.
A pebble tray filled with water beneath the pot raises local humidity around the plant. Misting the air around the bromeliad helps, but avoid misting directly into the cup — that dilutes the standing water and introduces tap-water minerals unnecessarily.
Temperature should stay between 60 and 80°F. Bromeliads have essentially no cold tolerance below 50°F, and prolonged exposure to cold drafts can cause leaf damage that the plant never fully recovers from.
Keep plants away from heating vents — the blasts of dry warm air desiccate the foliage and drop humidity exactly when the plant needs it most.
Bathrooms and kitchens with good natural light are excellent bromeliad spots. The steam from showers and cooking provides passive humidity that most dedicated humidifiers struggle to match.
Grouping bromeliads with other tropical plants — calathea, peace lily, ferns — creates a beneficial microclimate where transpiration from all the plants raises the local humidity around the group.
The bathroom plants guide covers more species that thrive in these naturally humid conditions.
Soil that mimics a tree branch
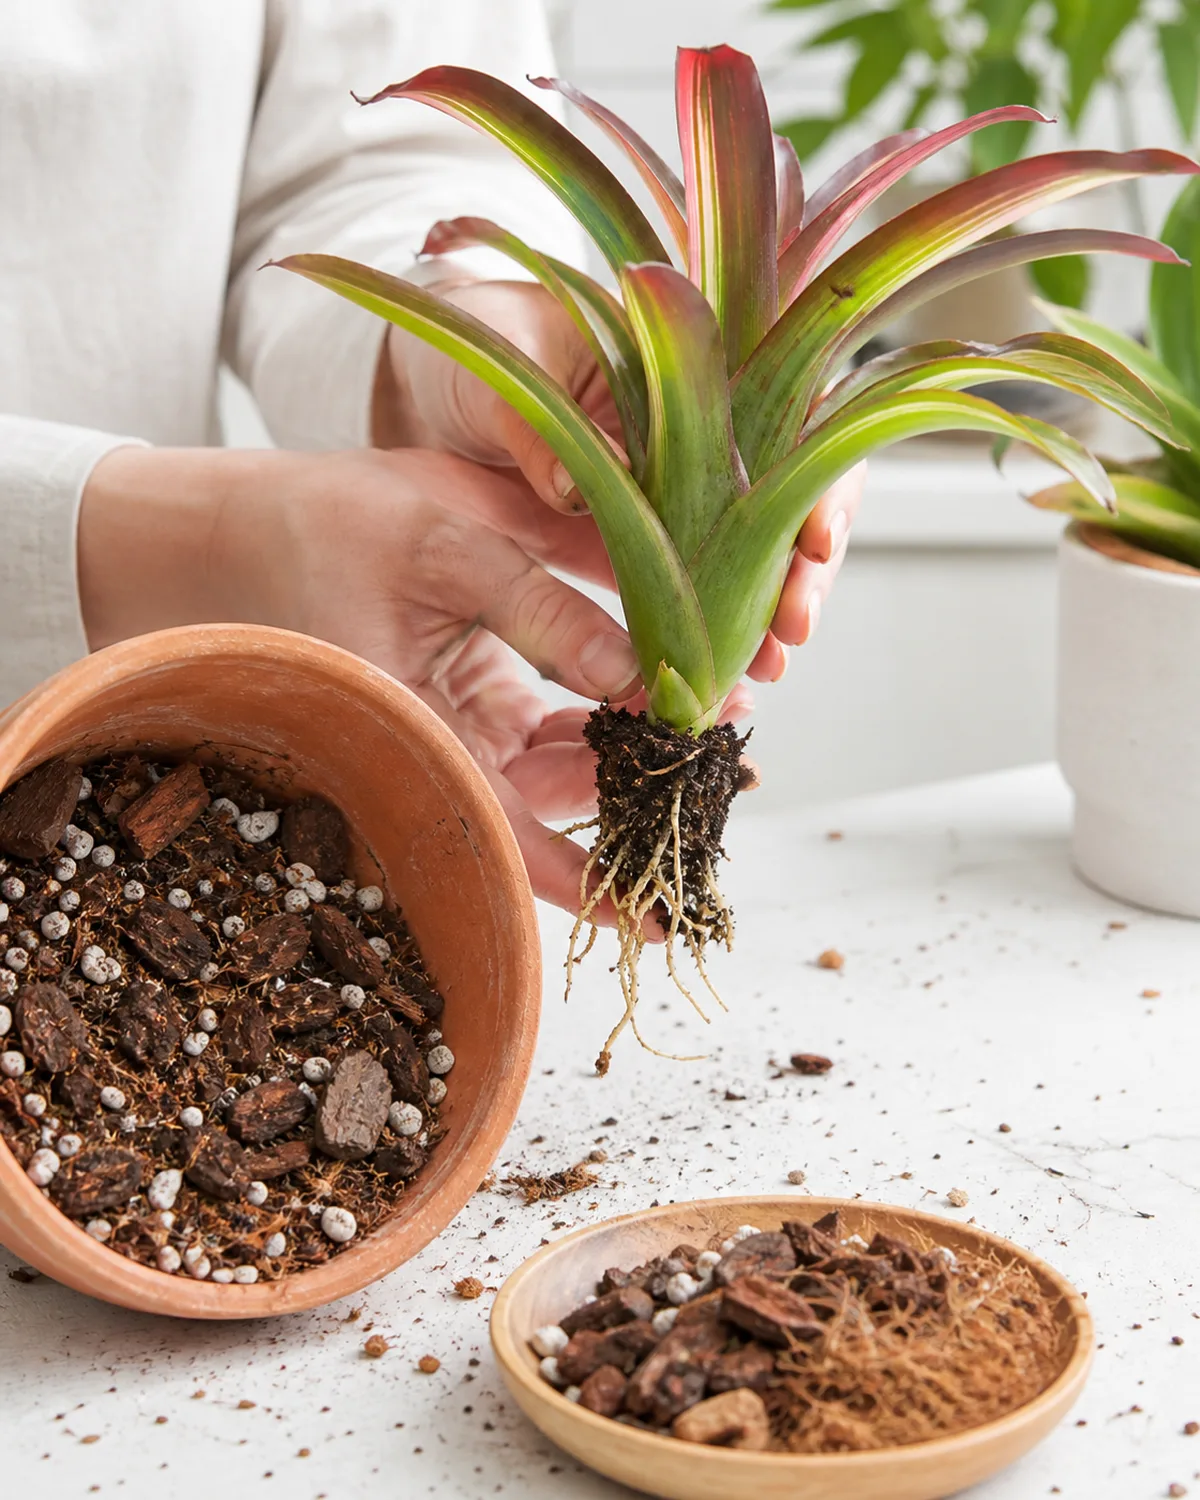
Standard potting soil retains far too much moisture for bromeliads and almost guarantees root rot within a few months. The ideal mix replicates the loose debris pockets where epiphytes root on tree branches in the wild.
Combine orchid bark, perlite, and peat moss or coco coir in roughly equal thirds. The result is a fast-draining, airy medium that holds just enough moisture to keep the anchoring roots functional without staying soggy. A commercial orchid or bromeliad mix straight from the bag works as a convenient shortcut — both are formulated for the same kind of root environment.
Every pot must have drainage holes. This is non-negotiable. The central cup handles the plant's water storage needs; the roots need air circulation, not a standing reservoir at the bottom.
Small to medium pots suit bromeliads better than oversized containers. The root system is surprisingly small relative to the dramatic top growth — a mature Guzmania with a two-foot leaf span might have a root ball no larger than a fist. Overpotting leaves too much wet soil around roots that cannot use the moisture.
Top-heavy rosettes tend to tip in lightweight plastic pots. A heavier terracotta or ceramic container provides the ballast to keep a large bromeliad stable, and terracotta's porous walls wick excess moisture from the soil as a bonus.
For the general approach to timing and technique, see the repotting guide.
Feeding without burning the leaves
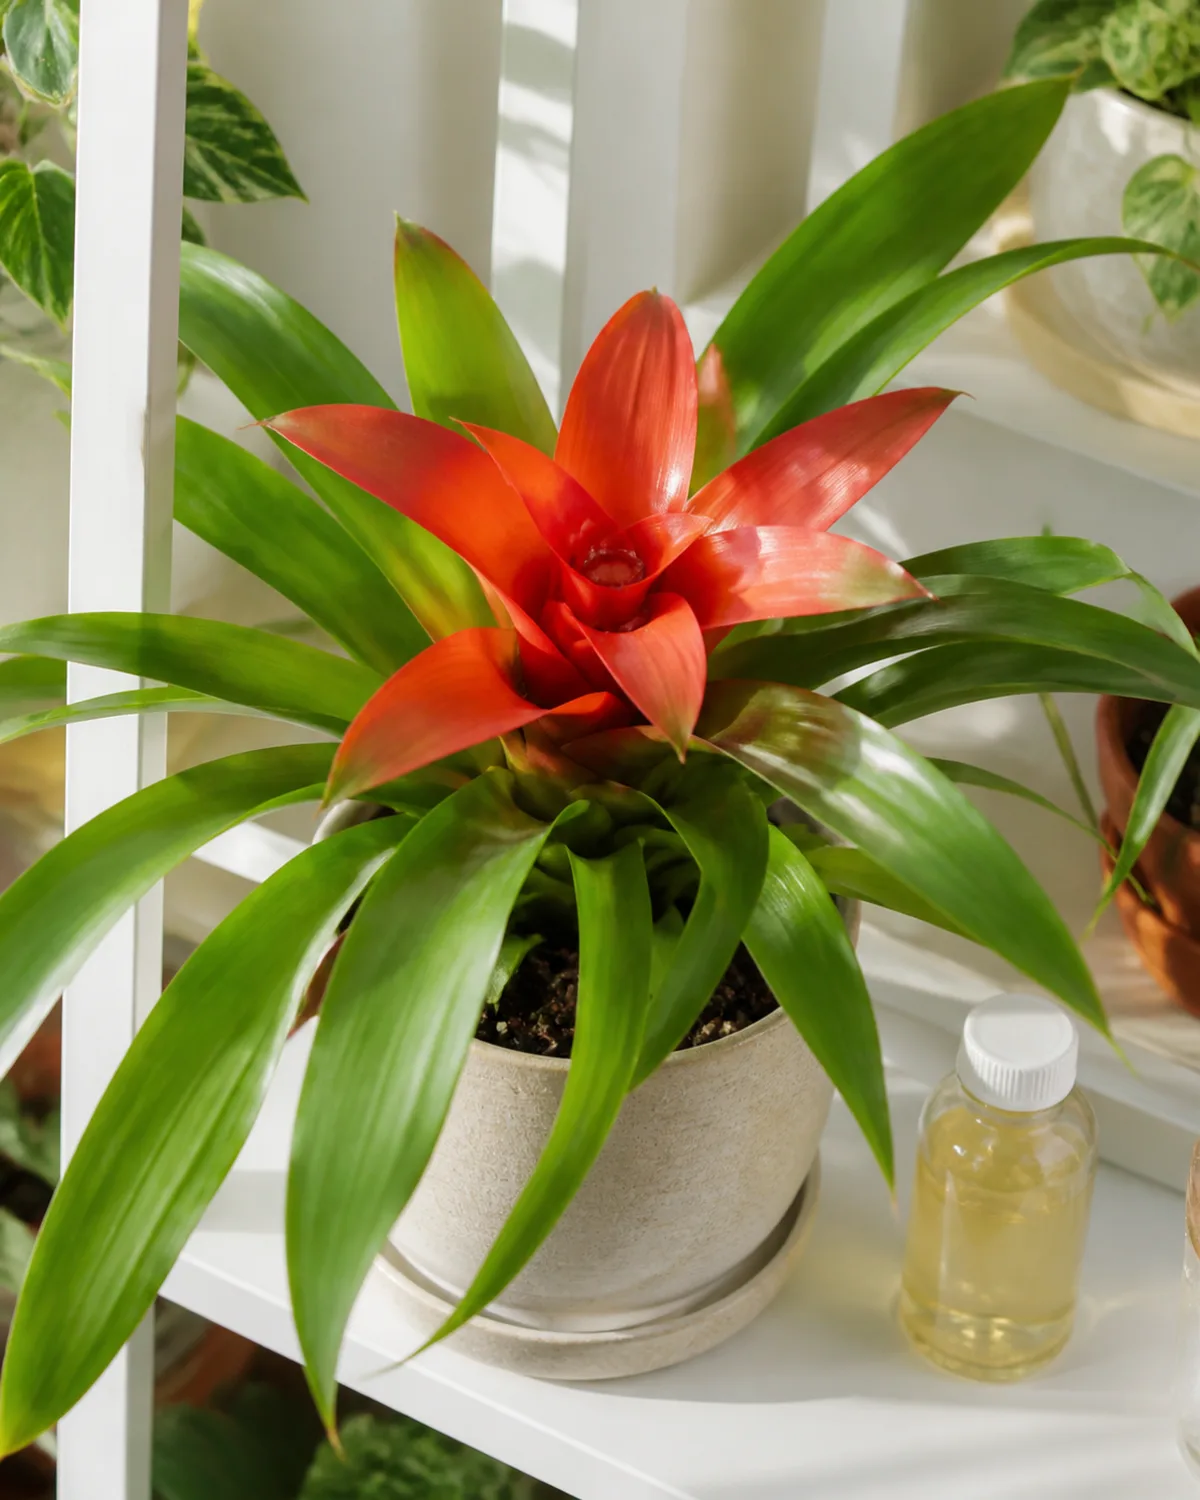
Bromeliads are light feeders. Half-strength balanced liquid fertilizer — a 10-10-10 or similar ratio — once a month during spring and summer covers their needs entirely.
The unique aspect of bromeliad feeding is dual delivery. Apply diluted fertilizer to the soil and add a small amount to the central cup. Because bromeliads absorb nutrients through both their root system and the trichomes on their leaves, feeding through the cup reaches the plant's primary absorption pathway directly.
Never place slow-release fertilizer granules in the cup. The concentrated minerals sit directly against the central tissue and cause chemical burns that can destroy the growing point. Granules in the soil are acceptable but not ideal — liquid feeding gives you more control over concentration.
Stop fertilizing entirely from autumn through winter. Growth slows dramatically during this period, and excess nutrients accumulate as damaging salt deposits on the leaves and in the soil. If you notice brown leaf tips or crusty white residue on the soil surface, flush the pot with plain water several times to wash out accumulated salts.
Foliar feeding works particularly well for bromeliads. Misting the leaves with a very dilute fertilizer solution leverages the trichomes' natural absorption function. Think of it as rain in the forest canopy — nutrients arrive dissolved in water that lands on the leaves.
One genus-specific note: heavy fertilizing can mute the vivid center coloring of Neoregelia. If color display is the goal, feed these plants sparingly and let the light do the work instead.
The fertilizing houseplants guide covers broader principles including how to diagnose overfertilizing across all species.
Why your bromeliad only blooms once and what to do about it
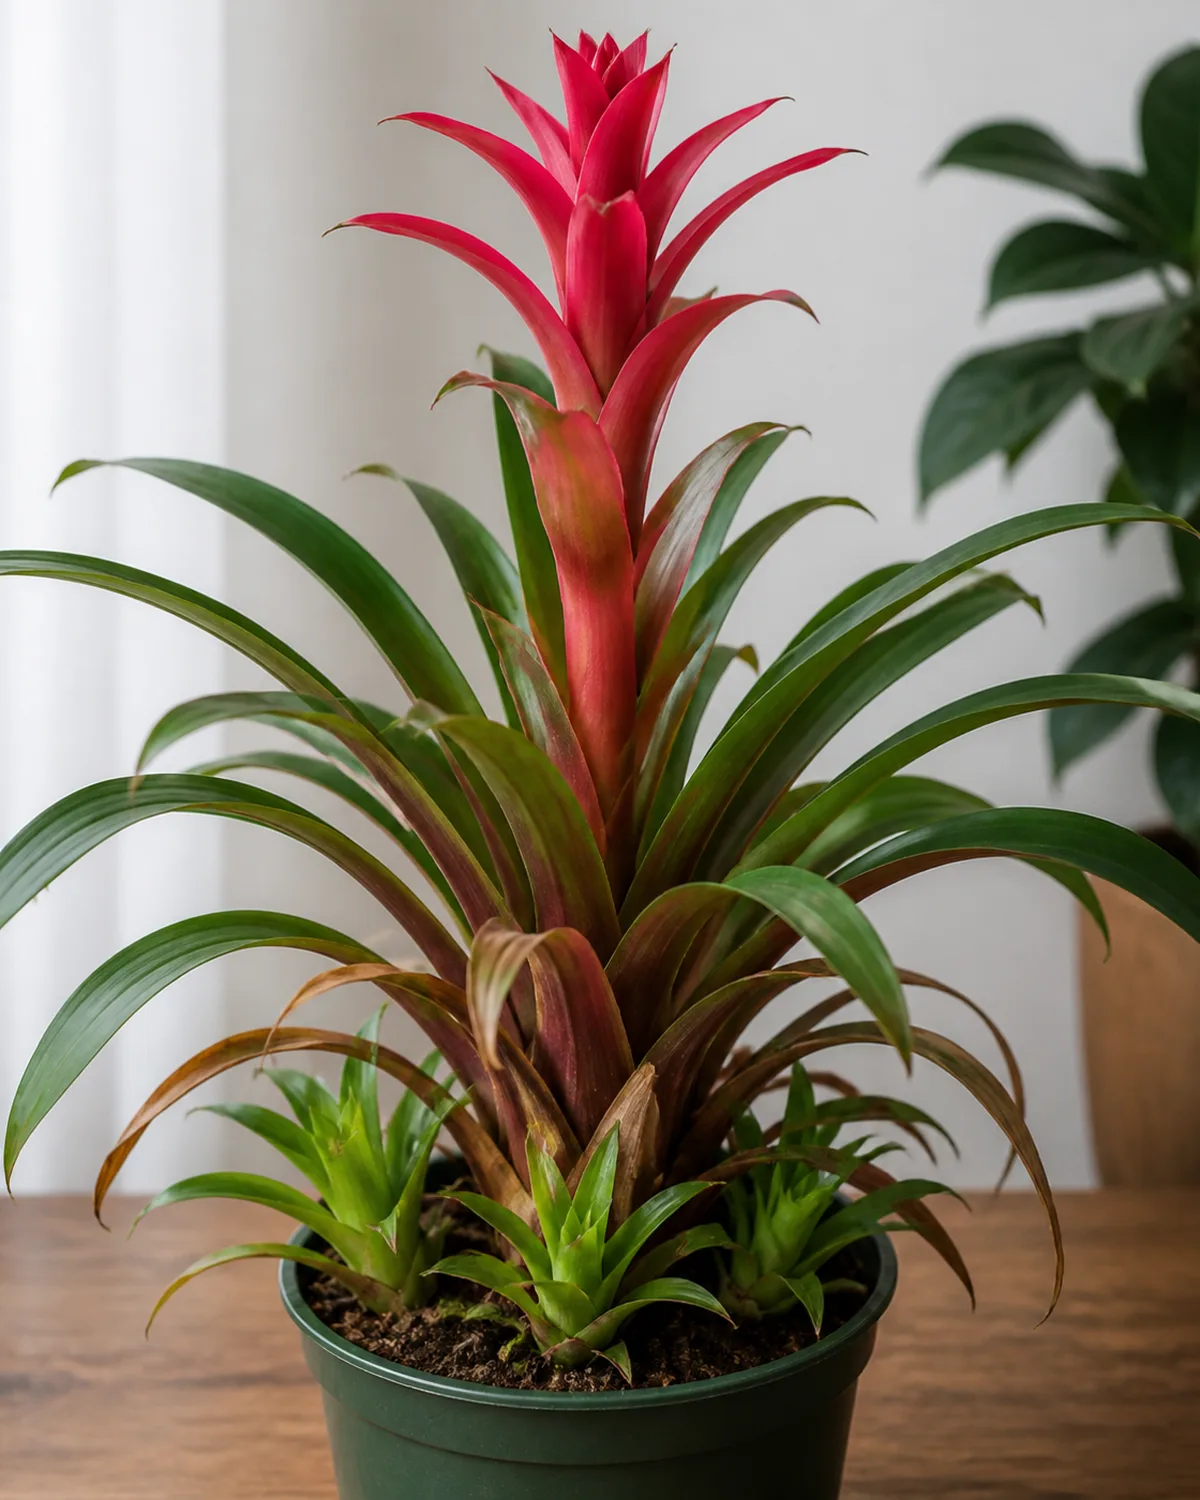
Every bromeliad rosette is monocarpic — it flowers one time in its entire life, then channels all remaining energy into producing the next generation. This is not a care failure. It is the fundamental biology of the family.
The colorful bracts can hold their vibrancy for three to six months, which is dramatically longer than the blooms on most houseplants. During this period, the plant is at its most visually stunning, and no special care beyond the usual cup-filling and light exposure is needed.
Once the bracts begin to fade and turn brown, cut the flower stalk at the base with clean, sharp shears. This tidies the appearance and redirects the plant's resources where they matter — into the pups developing at the base.
The mother plant will live for six to twelve additional months after blooming. During this phase, she produces between one and five pups around her base, feeding them through her root system while they develop their own leaf rosettes. She still photosynthesizes, still looks presentable, and still provides structural stability for the young offsets.
Do not remove a bromeliad simply because the bloom has finished. The pup-raising phase is as much a part of the lifecycle as the bloom itself, and separating the mother too early cuts off the pups' food supply before they can survive independently.
If your mature bromeliad has never bloomed after two or more years of growth, the ethylene trick described in the next section can trigger the process.
The ethylene trick: forcing a reluctant bromeliad to bloom
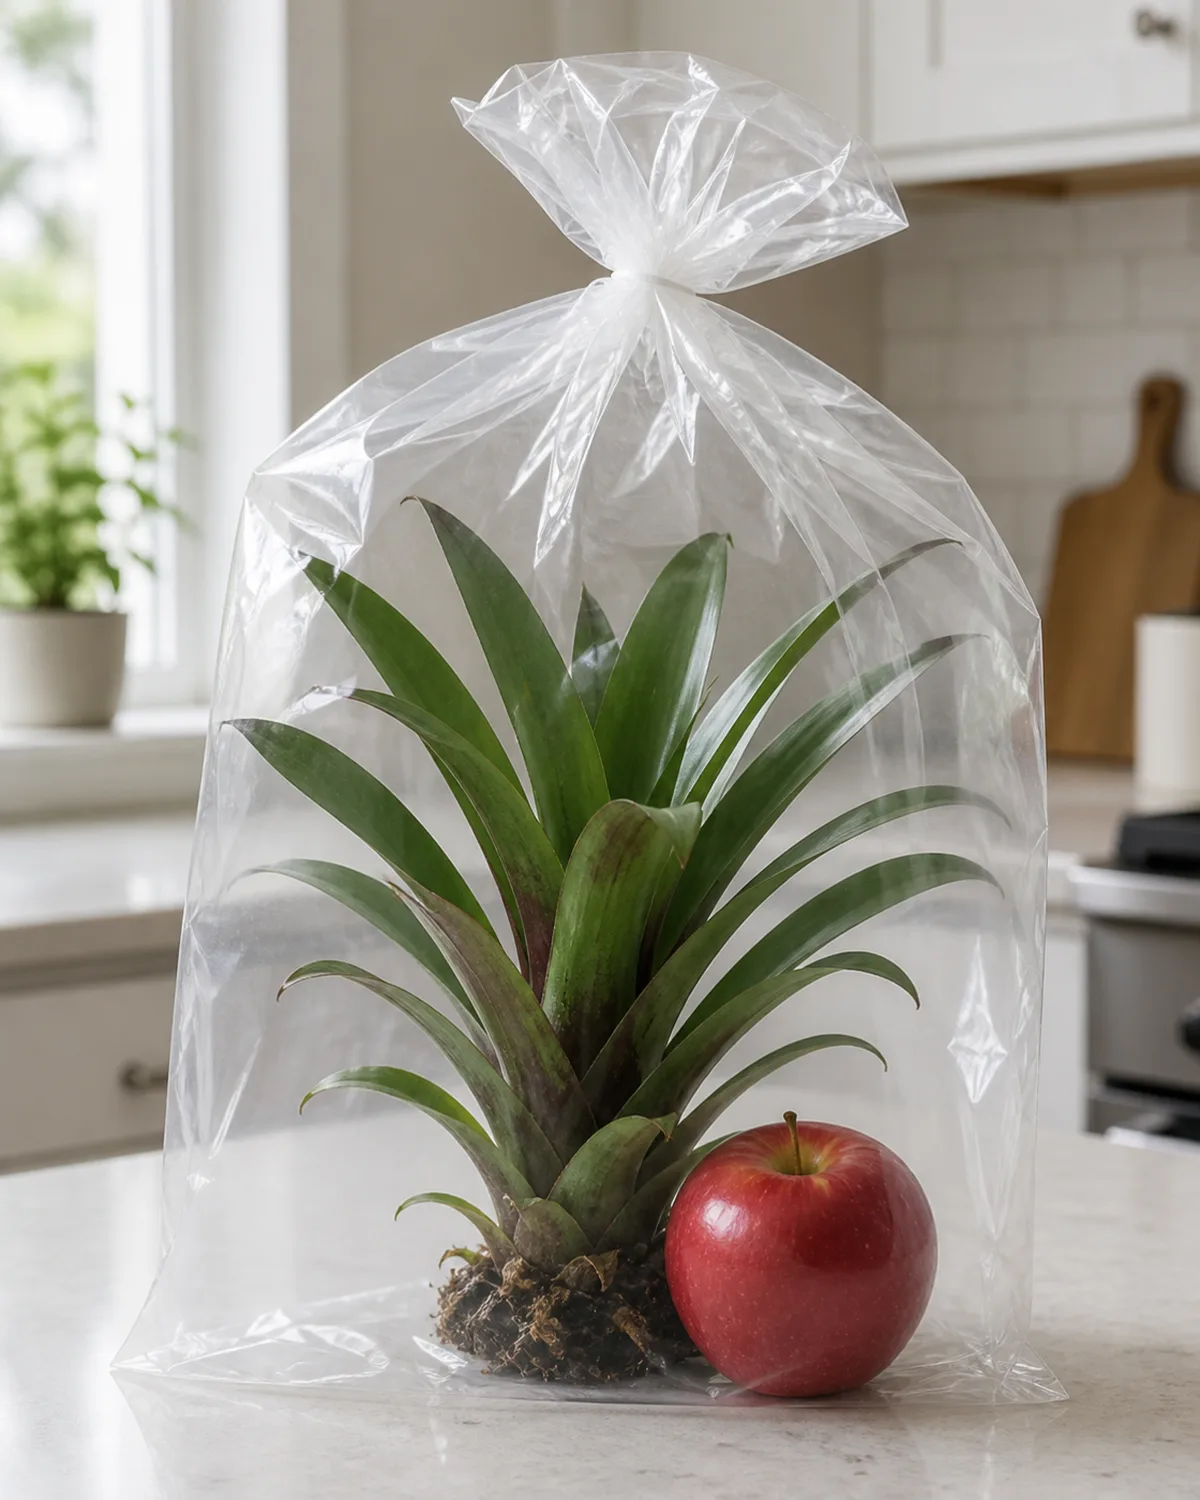
Ethylene is a natural plant hormone that triggers flowering in bromeliads. Every ripe apple releases it as part of the ripening process, and you can harness this to force a bloom on a mature plant that has not flowered on its own.
The method is straightforward. Place a ripe apple next to the bromeliad and cover both with a clear plastic bag, sealing it loosely at the top to trap the ethylene gas. Leave the setup in place for seven to ten days. The enclosed concentration of ethylene triggers the hormonal cascade that initiates flower development.
Remove the bag after ten days and resume normal care. Within six to eight weeks, you should see color development in the central cup area as the bracts begin to form. The timeline varies by species — Guzmania tends to respond fastest, while Aechmea may take closer to twelve weeks.
The trick works only on mature plants that have developed a full-sized rosette, typically one to two years old. Immature plants lack the stored energy to support bloom production and may abort the attempt.
This is a one-time intervention. You cannot force a second bloom — monocarpic means monocarpic. Once the rosette flowers, the lifecycle clock starts its final countdown regardless of whether the bloom was natural or ethylene-triggered.
The bag must be reasonably airtight. A loosely draped plastic bag allows ethylene to dissipate before reaching the effective concentration. A sealed gallon bag or a produce bag with its opening twisted closed works well.
One final consideration: ensure the plant is healthy and well-established before attempting the ethylene treatment. A stressed bromeliad — one recovering from root rot, cold damage, or a recent repotting — may not respond, and the added stress of the sealed bag environment can make existing problems worse.
This is the only houseplant on this entire site where you can chemically trigger bloom on demand.
Growing pups into new plants
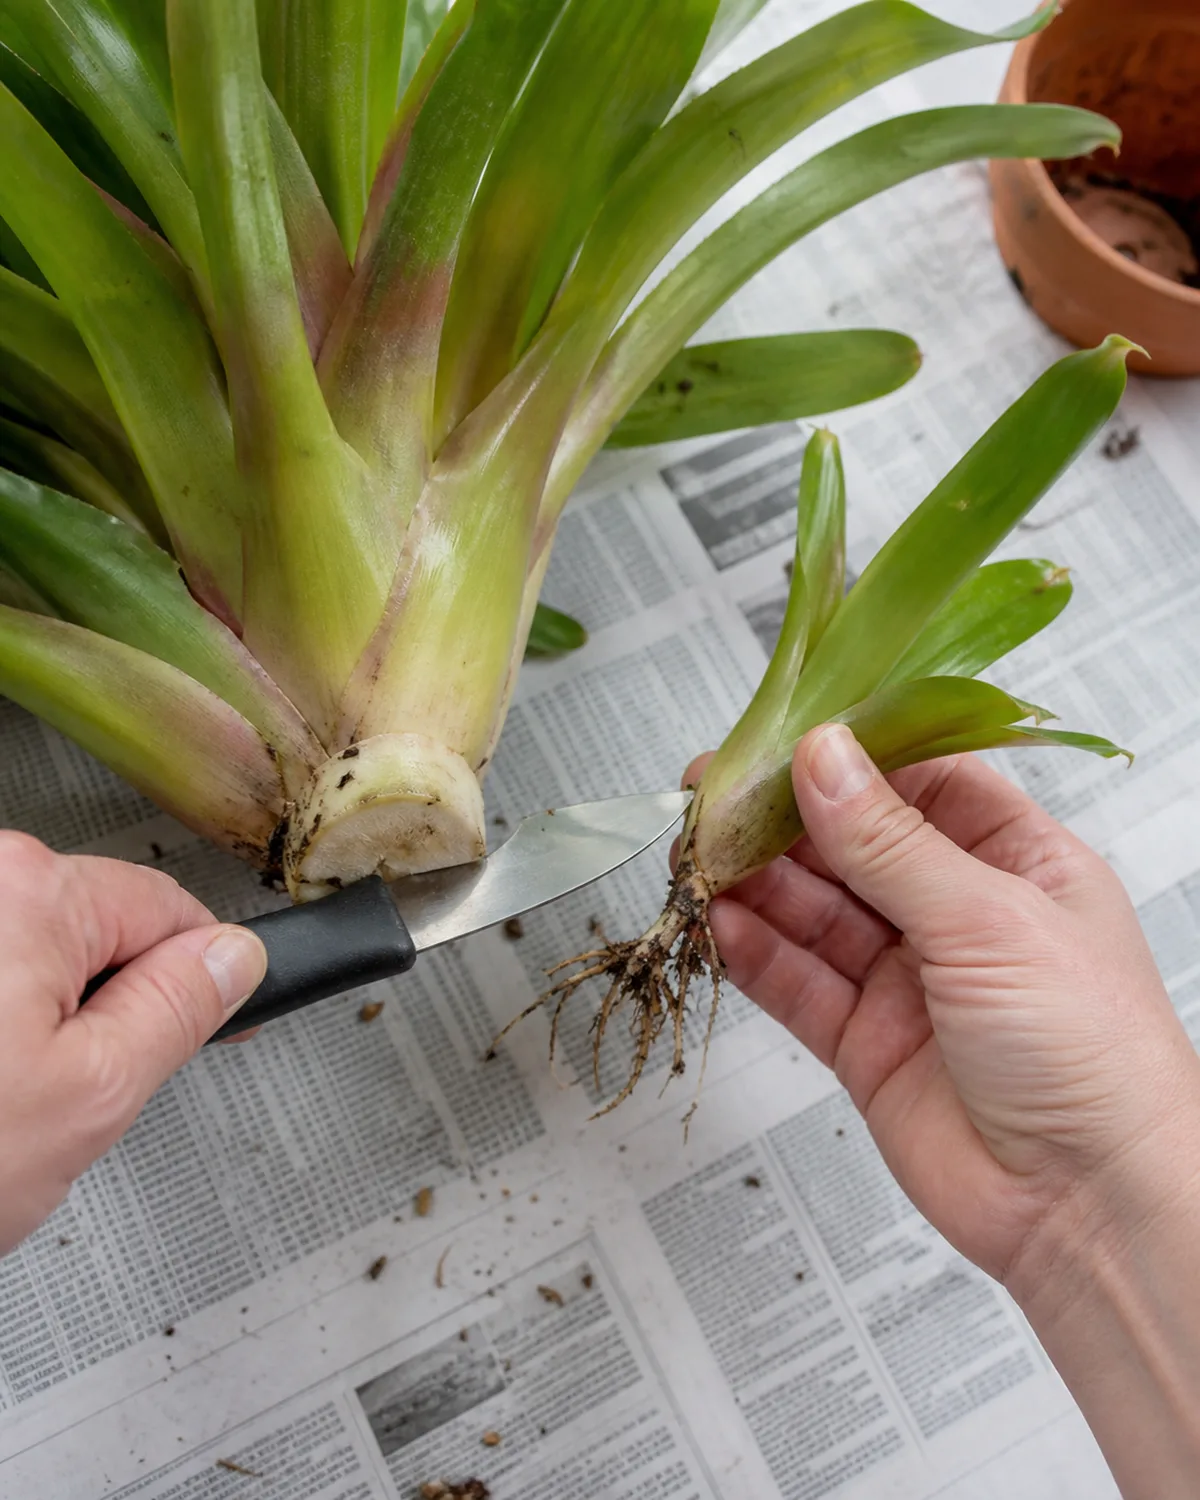
Pups appear at the base of the mother plant after blooming, sometimes earlier in particularly vigorous specimens. They emerge as small rosettes pushing out from between the lower leaves, drawing nutrients from the mother through a shared root connection.
The critical rule: wait until each pup reaches roughly one-third the size of the mother plant before separating. This typically means four to six inches tall with its own developing leaf rosette. Separating too early means the pup lacks sufficient root development to survive on its own — the most common cause of pup failure.
To separate, use a clean, sharp knife. Cut between the pup and the mother plant at soil level, angling the blade to include any roots already attached to the pup. A gentle twist sometimes frees a well-rooted pup without cutting, but a clean cut is more reliable and less likely to tear tissue.
Pot the separated pup in the same fast-draining mix used for adult bromeliads — orchid bark, perlite, and coir. Keep the newly potted pup warm, ideally 70 to 80°F, and maintain higher humidity for the first two to three weeks by covering the pot with a clear plastic bag or dome. Vent the cover daily to prevent mold.
Pups take one to three years to reach blooming maturity, depending on the species and growing conditions. Guzmania pups tend to mature and bloom in about two years under good conditions. Aechmea pups may take closer to three.
An alternative to separation: leave the pups attached. As the mother plant dies back, the pups gradually overtake her position, forming a multi-rosette clump that can be a dramatic display in its own right. Each pup eventually blooms, produces its own pups, and the cluster grows outward over years.
Each pup is a genetic clone of the mother — identical in every way. The characteristics you liked about the parent plant will repeat exactly.
For broader context on houseplant propagation methods, the propagation guide covers stem cuttings, division, and other techniques across species.
Common problems and what they actually mean
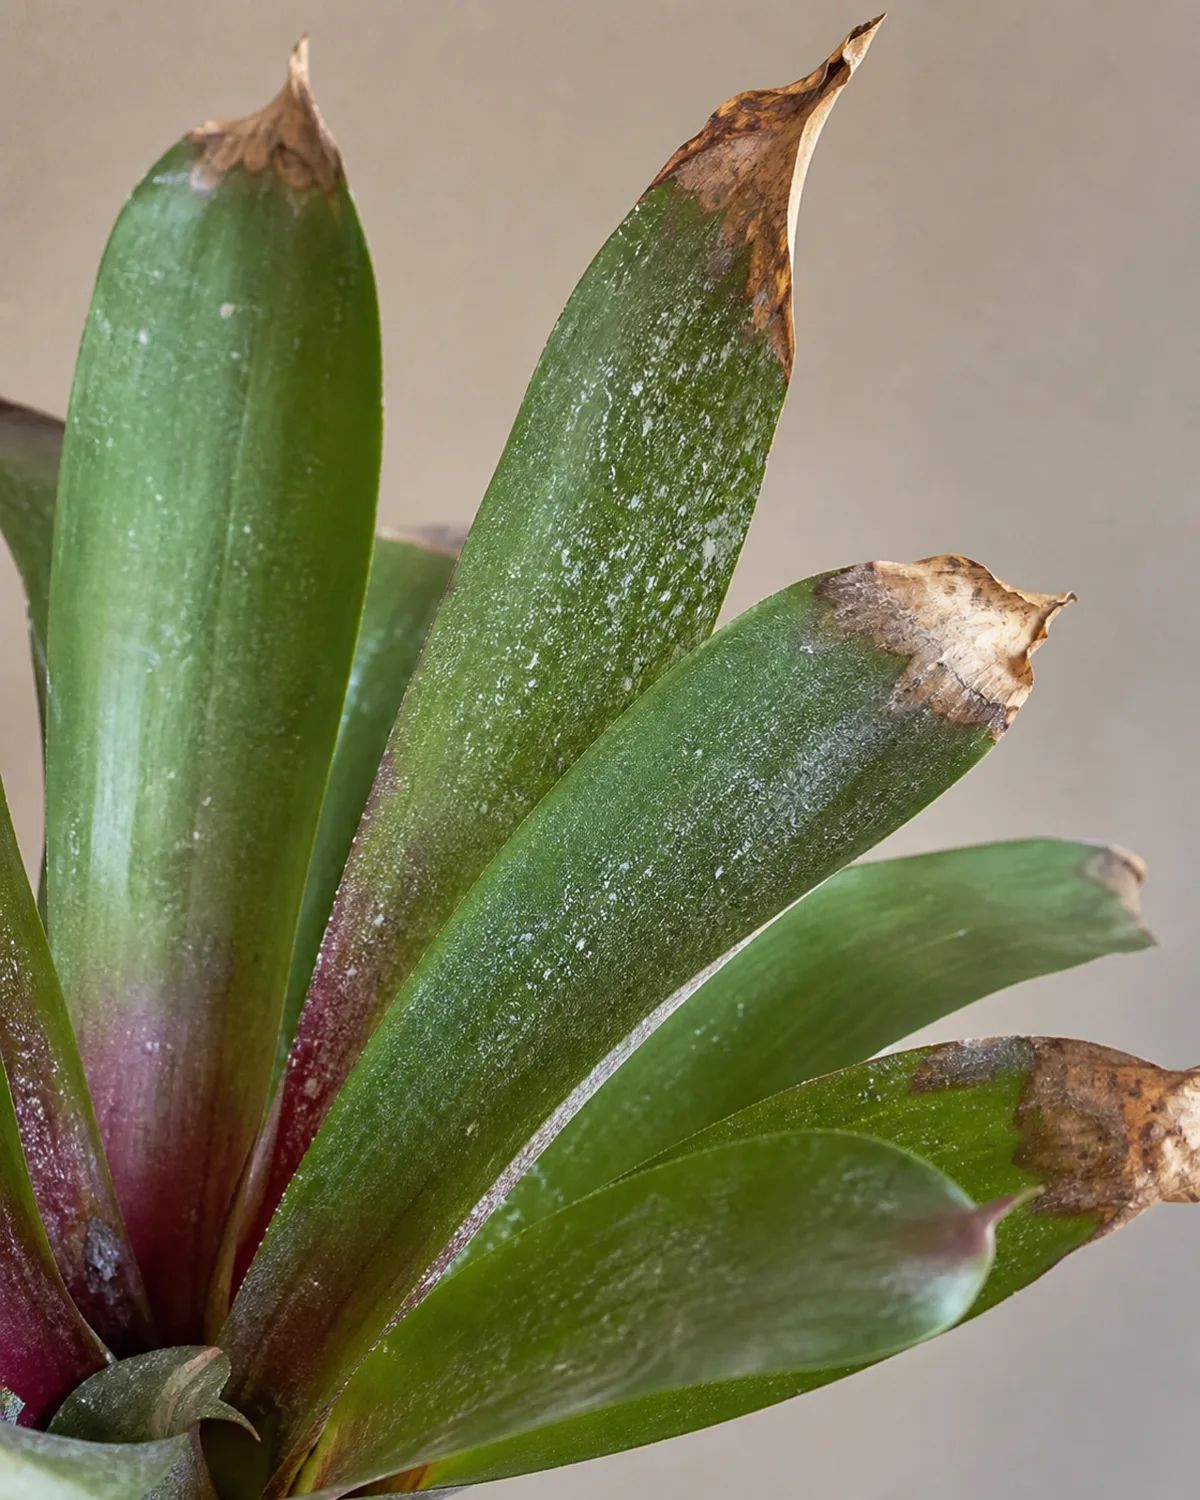
Brown leaf tips have three possible causes, and they look nearly identical: hard water minerals accumulating on the leaf edges, low humidity drying out the tissue, or overfertilizing causing salt burn. Diagnose by elimination — switch to distilled water first, increase humidity second, and reduce feeding third. Whichever change resolves the problem identifies the cause.
Soft mushy center means crown rot, usually from stagnant water in the cup combined with cool temperatures. This is often fatal. Remove all rotting tissue with a clean blade, stop watering the cup entirely for a week, and place the plant in the warmest, best-ventilated spot available. If pups are already developing at the base, they may survive even if the mother does not.
Pale or bleached leaves indicate too much direct sun. Move the plant to filtered light. The damaged leaves will not recover their color, but new growth will emerge with proper coloring if the light level is corrected.
Loss of bract color earlier than expected — before the three-to-six-month natural timeline — usually results from insufficient light during the bloom phase. This cannot be reversed for the current cycle. For the next generation, position the flowering plant in brighter indirect light from the moment bracts begin to show color.
Dying outer leaves are normal progression, not decline. Bromeliads shed their oldest leaves as new ones emerge from the center, just as dracaena drops lower leaves as the trunk extends. Trim brown outer leaves at the base with clean scissors.
White crusty deposits on leaves are mineral buildup from hard tap water. Switch to distilled or rainwater going forward and wipe existing deposits with a soft damp cloth. Prevention is easier than removal — once minerals bond to the leaf surface, they resist cleaning.
Four bromeliad mistakes almost everyone makes
- 1Watering the soil instead of the cupBromeliads absorb moisture through leaf trichomes and their central reservoir, not through their roots. Pouring water only on the soil ignores the plant's primary intake system and eventually leads to root rot from overwatered soil.
- 2Throwing out the plant after bloomingA finished bloom is not a finished plant. Pup production is just beginning, and the mother provides nutrients to her offsets for months. Discarding her means discarding the next generation before it can survive alone.
- 3Using tap water in the cupChlorine and dissolved minerals cause brown leaf tips and leave white deposits on the foliage that never come off. Distilled or collected rainwater solves both problems. If tap is all you have, let it sit uncovered for 24 hours to off-gas chlorine.
- 4Separating pups too earlyTiny pups look ready but lack the root development to survive on their own. Wait until each pup reaches one-third the size of the mother before cutting — rushing this step is the leading cause of pup failure.
kultivy.com
Pests that find bromeliads and how to handle them
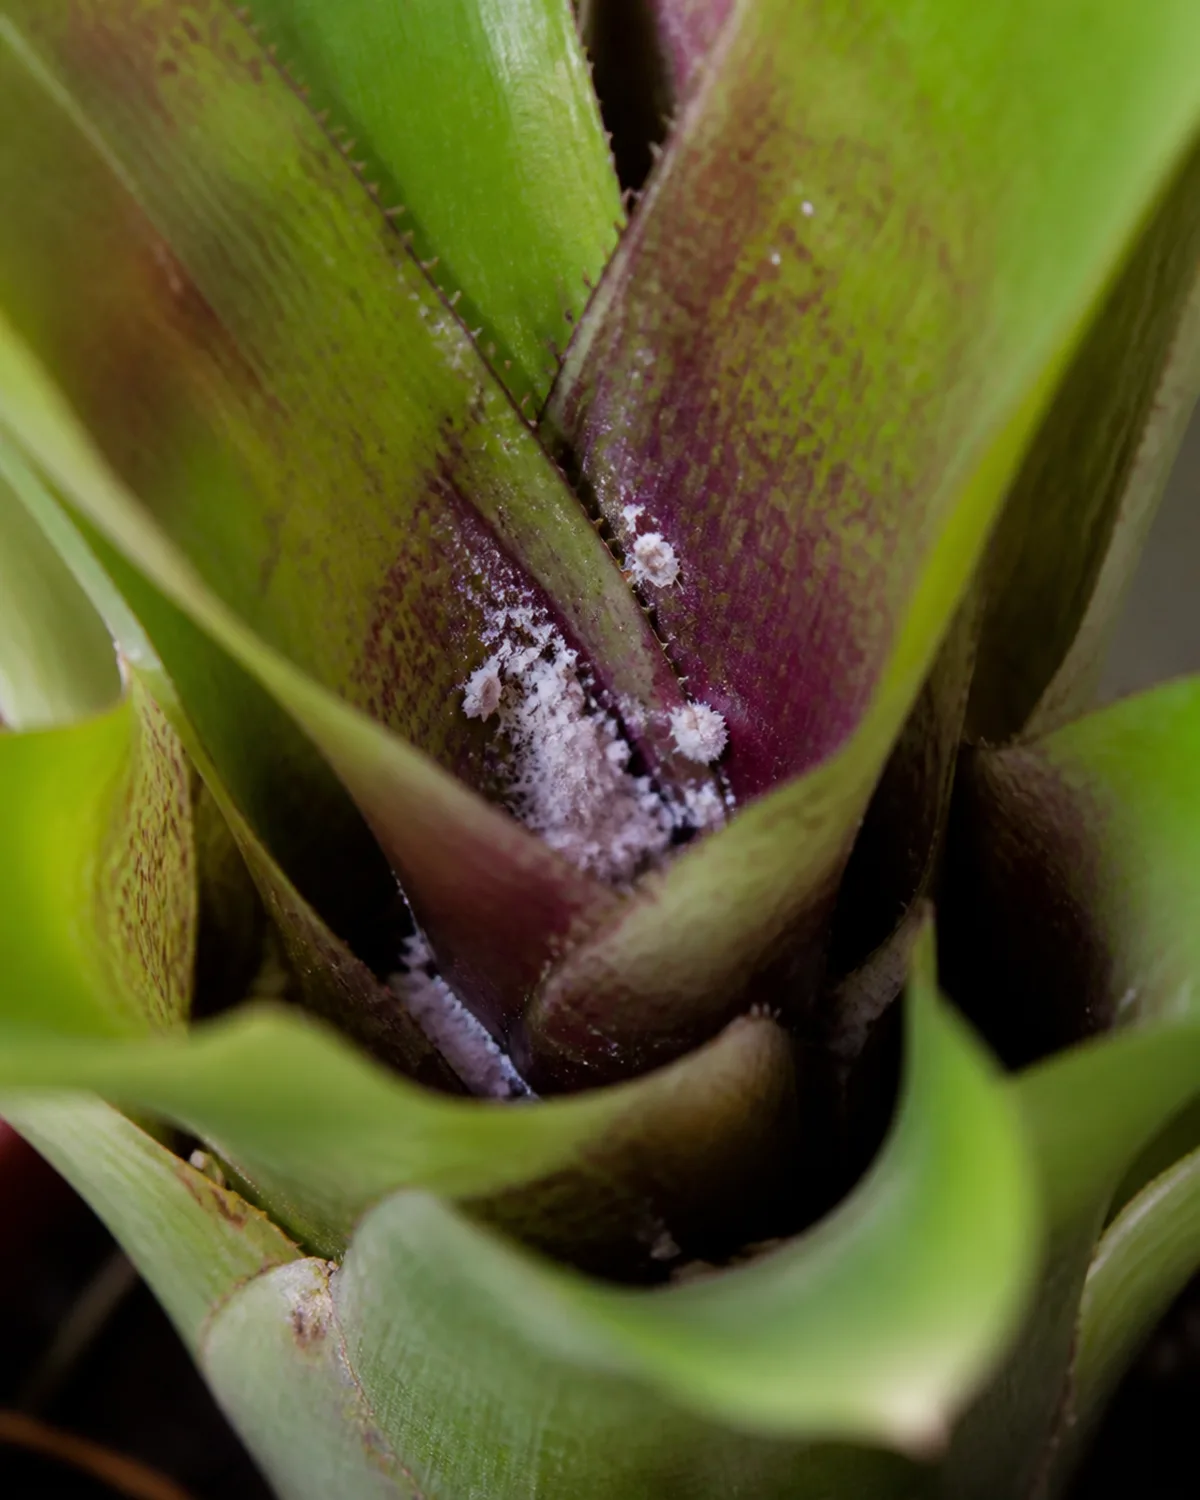
Scale insects are the most common pest on bromeliads. They appear as small brown or white bumps on leaves, particularly along the undersides and near the base where leaves meet the central stem. Scale feeds by piercing the leaf tissue and draining sap, causing yellowing and weakened growth over time.
Remove scale individually with a cotton swab dipped in rubbing alcohol. For heavier infestations, apply horticultural oil to smother the insects. Scale does not move once it settles, so each bump you remove is one fewer pest — thorough manual removal works.
Mealybugs are the second most frequent visitor. These white, cottony insects hide in leaf axils — the tight crevices where each leaf joins the central stem — and inside the cup itself. Their preferred habitat makes them harder to spot than scale. Flush the cup thoroughly with fresh water to dislodge mealybugs hiding inside, then treat affected areas with insecticidal soap.
Fungus gnats breed in consistently moist soil. If tiny flies hover around your bromeliad, the soil is staying too wet for too long between waterings. Improve drainage by adding more perlite or bark to the mix, and let the top inch dry more thoroughly before the next watering. Yellow sticky traps near the soil surface catch adults while the soil dries enough to interrupt the larval cycle.
One outdoor consideration: if you place bromeliads on a porch or patio during warm months, mosquitoes will breed in the cup water. Flush the cup at least weekly, and consider adding a Bti dunk (a biological mosquito larvicide) to the water.
Avoid systemic pesticides in the cup. These chemicals are designed for soil application and root uptake — direct contact with the central leaf tissue through cup water can cause chemical burns.
Spider mites are less common on bromeliads than on thin-leaved plants like English ivy or tradescantia, but they can appear in very dry conditions. The full pest identification and treatment protocol is covered in the houseplant pests guide.
Best bromeliad species for indoor growing
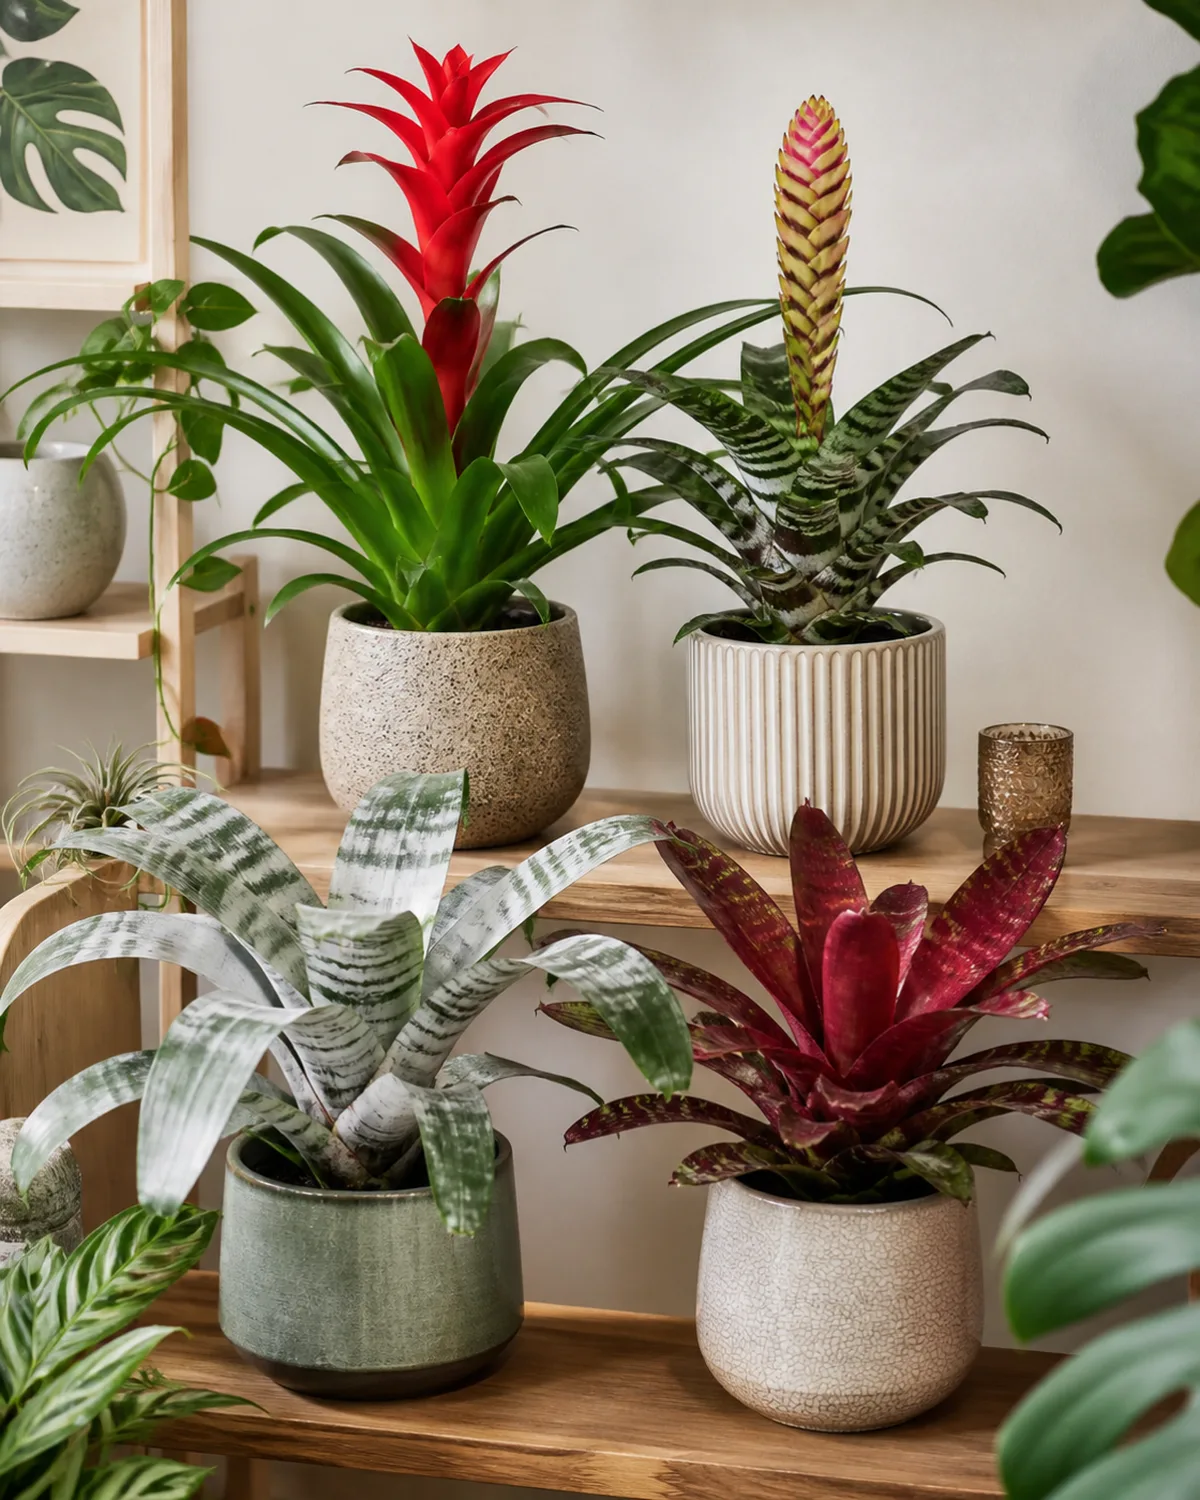
Guzmania lingulata is the bromeliad most people encounter first. A star-shaped rosette of glossy green leaves surrounds a central inflorescence of vivid red, orange, pink, or yellow bracts. It tolerates lower light than most bromeliads, which makes it the most versatile for typical indoor conditions. The bloom lasts two to four months. If you are choosing your first bromeliad, start here.
Vriesea splendens, known as the Flaming Sword, produces a flat, sword-shaped red inflorescence that rises dramatically above banded or striped leaves. The silhouette is architectural — more vertical statement piece than rounded rosette. It handles moderate light well and the distinctive striped foliage remains attractive long after the bloom fades.
Aechmea fasciata, the Silver Vase, is the toughest indoor bromeliad by a wide margin. Silver-green banded leaves form a sturdy vase-shaped rosette, and the pink bract cluster at the center is one of the longest-lasting displays in the family.
Aechmea handles neglect, lower humidity, and inconsistent watering better than any other genus. It is the gateway bromeliad for people who have killed easier plants.
Neoregelia takes a different approach to color. Instead of producing a tall inflorescence, the center of the rosette flushes vivid red, purple, or pink as the plant approaches bloom. The effect is striking — a living color wheel that intensifies over weeks. Neoregelias stay compact and need brighter light than Guzmania to develop their best coloring.
Cryptanthus, the earth stars, break from the epiphytic pattern. These small, flat bromeliads grow terrestrially — on the ground rather than on trees. Their striped and patterned rosettes press close to the soil surface, making them ideal for terrariums, fairy gardens, and shallow display bowls.
Tillandsia, the air plants, are technically bromeliads but they occupy a completely different care category. They are rootless, mounted rather than potted, and absorb all moisture and nutrients through their leaves alone. Their care diverges so far from tank bromeliads that they deserve their own dedicated guide.
Choosing guidance: Aechmea for the most forgiving first experience, Guzmania for dramatic color with minimal effort, Neoregelia if you have bright light and want a color show without a tall flower stalk, and Cryptanthus if you want a bromeliad small enough for a terrarium.
Toxicity and pet safety
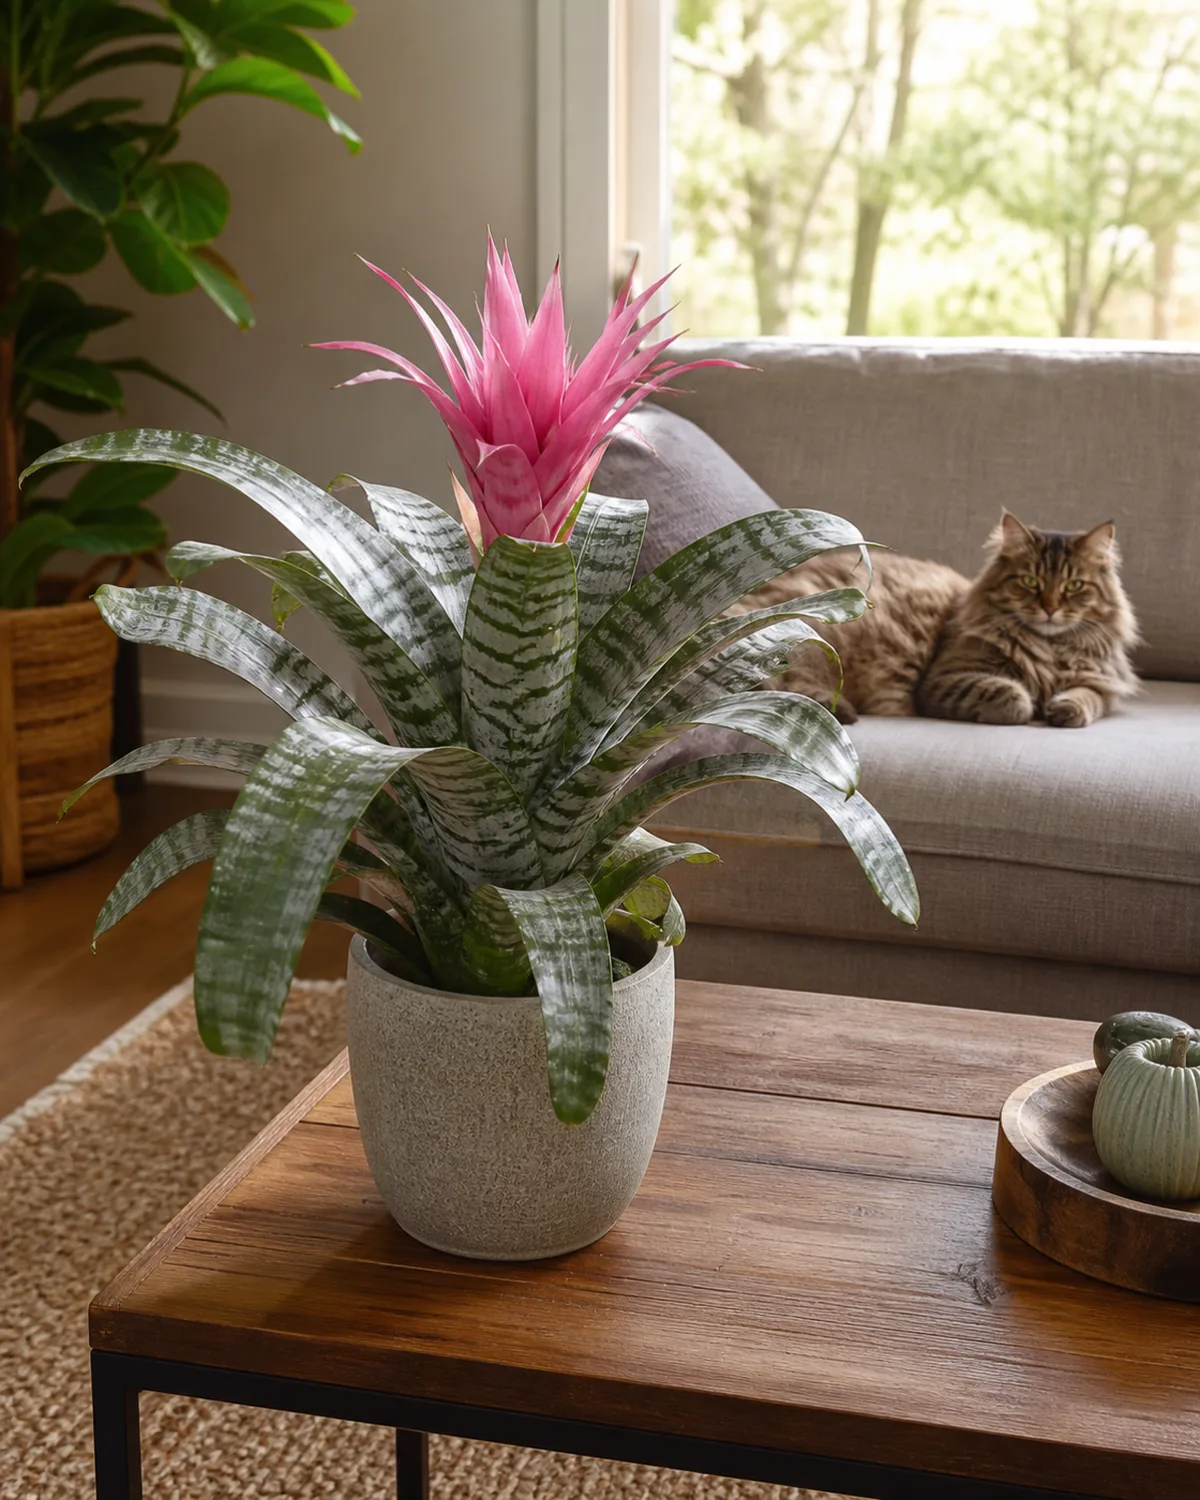
Bromeliads are non-toxic to cats, dogs, and humans. The ASPCA verifies this for Guzmania, Vriesea, Aechmea, and Neoregelia — the four genera that dominate the indoor market. This makes bromeliads one of the safest flowering houseplants available for pet-owning households.
The only physical concern involves leaf edges. Some species, particularly Aechmea, have stiff leaves with slightly serrated or spiny margins that can scratch a curious pet's nose or paw. This is a mechanical issue, not a toxicity concern — the plant contains no harmful compounds.
The pineapple plant (Ananas comosus) is also a bromeliad and also non-toxic, though the fruit skin contains bromelain, an enzyme that can cause mild mouth irritation if consumed in large quantities by pets.
One behavioral note: cats are sometimes attracted to the standing water in the central cup. Drinking from the cup is not harmful, but flush the water regularly to keep it fresh. Stagnant cup water that has been sitting for weeks is not something any animal should drink.
Bromeliads fill a gap that few other houseplants can. They offer dramatic color — vivid reds, oranges, pinks, and purples — without the toxicity risk that comes with other colorful options.
Peace lily produces a similar white-spathe visual impact but contains calcium oxalate that makes it toxic to pets. Croton delivers saturated foliage colors but its sap irritates skin and is toxic if ingested. Bromeliads match the visual drama while remaining completely safe.
For a comprehensive guide to building a fully pet-safe indoor garden, the plants safe for cats guide lists every verified non-toxic species on this site.

Mara Quinn edits Kultivy, where she shares houseplant care, propagation, beginner-friendly plant picks, and plant-styling ideas for anyone who wants their indoor plants to actually thrive. Every guide is image-led and reviewed for clarity, usefulness, image accuracy, and Pinterest-to-page alignment before it goes live. Visit the About page.